Manage Repositories
This Guide will help you to create and manage your repositories.
Is your setup running?
You must have gone through setup to create your first repository. If you have not setup yet please click here
Create a repository
To create your first repository, you need to set it up from the Lepsta Platform. On your workspace or team workspace navigate to to the create+ button and select repository.
Lepsta allows you to either create a brand new repository, or Import an existing Git repository, as seen on the image below:
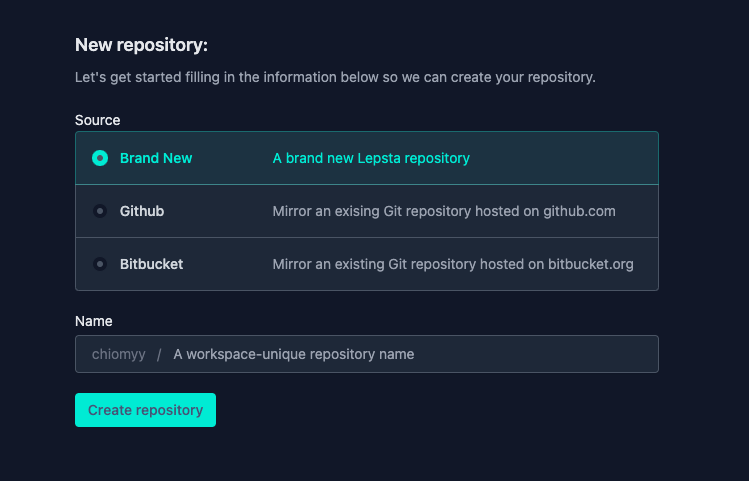
If you chose this option, your repository will be created on the Lepsta Platform, and will not be linked with an existing repository.
This option will allow you to create a repository as a mirror of an existing Git repository hosted on Github. This means that the two repositories will become linked and changes will be synced between the two of them.
This option will allow you to create a repository as a mirror of an existing Git repository hosted on Bitbucket. This means that the two repositories will become linked and changes will be synced between the two of them.
Download (Mount) your repository
Congratulations on creating your shiny first Lepsta repository. Now you have to mount/download it locally so that you can contribute code to it. In order to do that however, ensure that you have installed Uju to your machine. Learn more about installing Uju
Add a device for the first time
Before you can download a repository for the first time on Lepsta, you will be prompted to add a device.
Click on the add a device click link and you will be prompted to add your device based on the operating system you are using. Either Mac Os/Linux or windows machine. Head on to install Uju on your machine. Learn more about installing Uju

Select a device
As a return user, you will be prompted to choose a device from the list of devices you have worked on using uju.
You can either click on the wizard to let Lepsta automatically mount path (where you want to keep the repository) or you can run the command below on your terminal:
uju down <yourusername>/<reponame> <localpath>

Tip
You can get the "correct" command from the platform after creating your repository. See the image above:
Once the repository is available on your development computer, you can open it using a code editor of your choice and start working.
See gif image below on how to create and mount a new repository for the first time.

Attention: Did any of these steps fail?
Just in case some of these steps did not go according to documentation, consider making a search on the top bar to check if the issue and solution are documented.